Content from What is a HPC?
Last updated on 2023-05-16 | Edit this page
Overview
Questions
- Why would I be interested in High Performance Computing (HPC)?
Objectives
- Describe what an HPC system is
- Identify how an HPC system could benefit you.
Introduction
Open the Introduction Slides in a new tab for an introduction to the course and Research Computing.
Defining common terms
What is cluster computing?
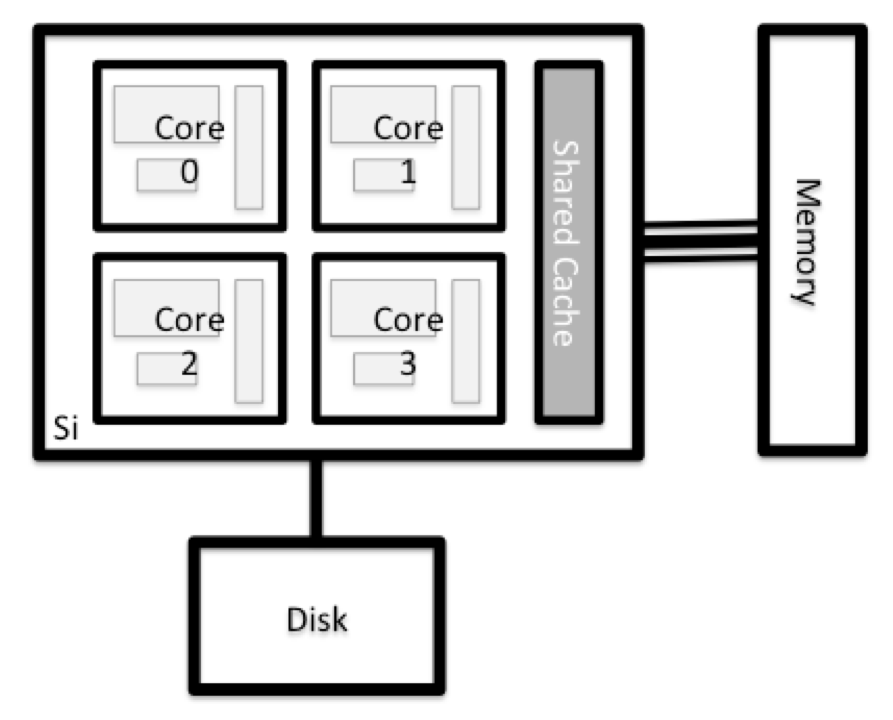
Cluster computing refers to two or more computers that are networked together to provide solutions as required.
A cluster of computers joins computational powers of the individual computers (called “compute nodes”) to provide a more combined computational power.

What is a HPC cluster?
HPC stands for High Performance Computing, which is the ability to process data and perform complex calculations at high speeds.
In its simplest structure, HPC clusters are intended to utilize parallel processors to apply more computing force to solve a problem. HPC clusters are a kind of compute clusters that typically have a large number of compute nodes, which share a file system designed for parallel reading and writing, and use a high-speed network for communication with each other.
What is a supercomputer?
Supercomputer used to refer to any single computer system that has exceptional processing power for its time. But recently, it refers to the best-known types of HPC solutions. A supercomputer contains thousands of compute nodes that work together to complete one or more tasks in parallel.
How is supercomputing performance measured?
The most popular benchmark is the LINPACK benchmark which is used for the TOP500. The LINPACK benchmark reflect the performance of a dedicated system for solving a dense system of linear equations. It uses the number of floating point operations per second (FLOPS) as the metric. The GREEN500 ranking has also risen in popularity as it ranks HPC systems based on FLOPS per Watt of power (higher the better).
When to use a HPC cluster?
Frequently, research problems that use computing can outgrow the capabilities of the desktop or laptop computer where they started, such as the following examples
- A statistics student wants to cross-validate a model. This involves running the model 1000 times – but each run takes an hour. Running the model on a laptop will take over a month! In this research problem, final results are calculated after all 1000 models have run, but typically only one model is run at a time (in serial) on the laptop. Since each of the 1000 runs is independent of all others, and given enough computers, it’s theoretically possible to run them all at once (in parallel).
- A genomics researcher has been using small datasets of sequence data, but soon will be receiving a new type of sequencing data that is 10 times as large. It’s already challenging to open the datasets on a computer – analyzing these larger datasets will probably crash it. In this research problem, the calculations required might be impossible to parallelize, but a computer with more memory would be required to analyze the much larger future data set.
In these cases, access to more (and larger) computers is needed. Those computers should be usable at the same time, solving many researchers’ problems in parallel.
Therefore, HPCs are userful when you have:
- A program that can be recompiled or reconfigured to use optimized numerical libraries that are available on HPC systems but not on your own system;
- You have a parallel problem, e.g. you have a single application that needs to be rerun many times with different parameters;
- You have an application that has already been designed with parallelism;
- To make use of the large memory available;
- When solutions require backups for future use. HPC facilities are reliable and regularly backed up.
How to interact with HPC clusters?
Researchers usually interact with HPC clusters by connecting remotely to the HPC cluster via the Linux command line. This is because of its low cost and setup as well as most research HPC software being written for the Linux command line. Microsoft Windows HPC facilities exist, but usually serve specific niches like corporate finance.
However, graphical interfaces have become popular and have helped lower the barrier to learning how to use HPC. Open OnDemand being the most popular example of software that helps users interact with HPC graphically.
What is Milton?

In 2016, WEHI purchased an on-premise HPC cluster called Milton, Milton includes >4500-cores (2 hyperthreads per core), >60TB memory, ~ 58 GPUs, >10 petabytes of tiered-storage. All details are available here.
Milton contains a mix of Skylake, Broadwell, Icelake and Cooperlake Intel processors.

Key Points
- Using High Performance Computing (HPC) typically involves connecting to very large computing systems that provides a high computational power.
- These systems can be used to do work that would either be impossible or much slower on smaller systems.
- HPC resources are shared by multiple users.
- The resources found on independent compute nodes can vary in volume and type (amount of RAM, processor architecture, availability of shared filesystems, etc.).
- The standard method of interacting with HPC systems is via a command line interface.
Content from Accessing Milton
Last updated on 2023-05-16 | Edit this page
Overview
Questions
- How do I log in to
Milton? - Where can I store my data?
Objectives
- Connect to
Milton. - Identify where to save your data
Milton Cluster
Milton is a linux-based cluster, that is made up of two login nodes and many computer nodes in addition to the file systems.
Connect to Milton
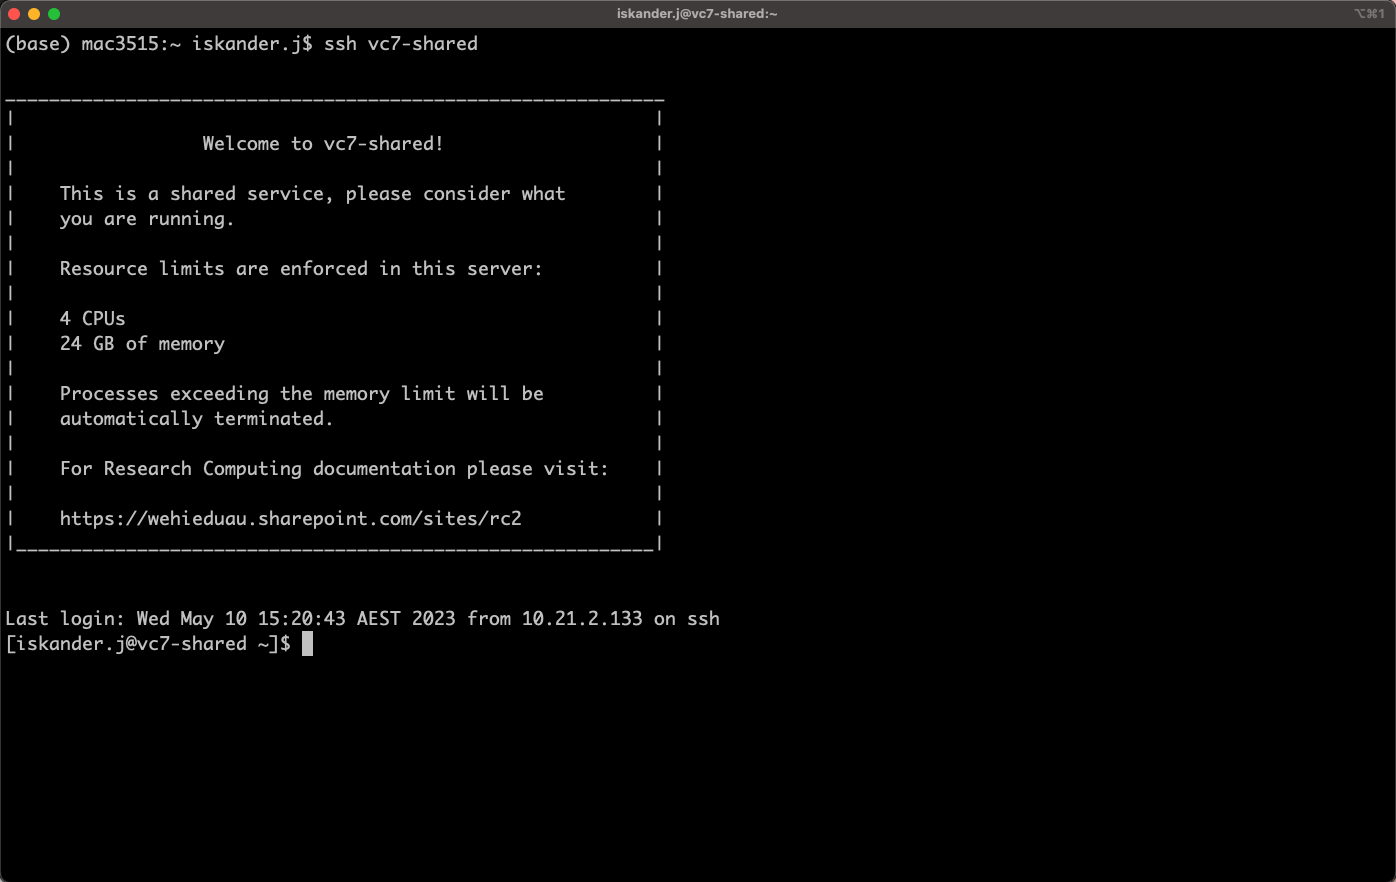
The first step in using a cluster is to establish a connection from your laptop to the cluster. You need a Windows Command Prompt or macOS Terminal, to connect to a login node and access the command line interface (CLI).
Exercise 1: Can you login to Milton?
If not in WEHI, make sure you are on the VPN. While on a WEHI device, open your terminal and login to vc7-shared.
More details are available here.
- For Mac OSX users
ssh vc7-shared- Type your password
- For MS-Windows users
- Download and install the free PuTTY client.
- You can also use Cluster Access on Open OnDemand
You will be asked for your password.
Watch out: the characters you type after the
password prompt are not displayed on the screen. Normal output will
resume once you press Enter.
You will notice that the prompt changed when you logged into the remote system using the terminal.
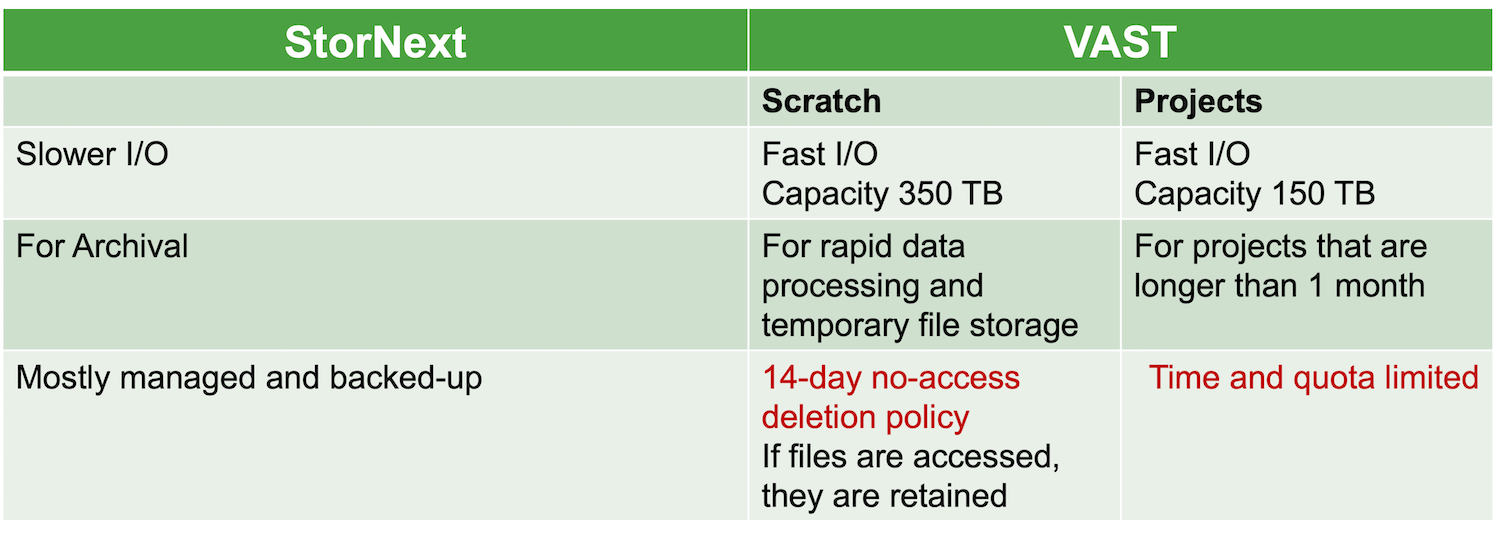
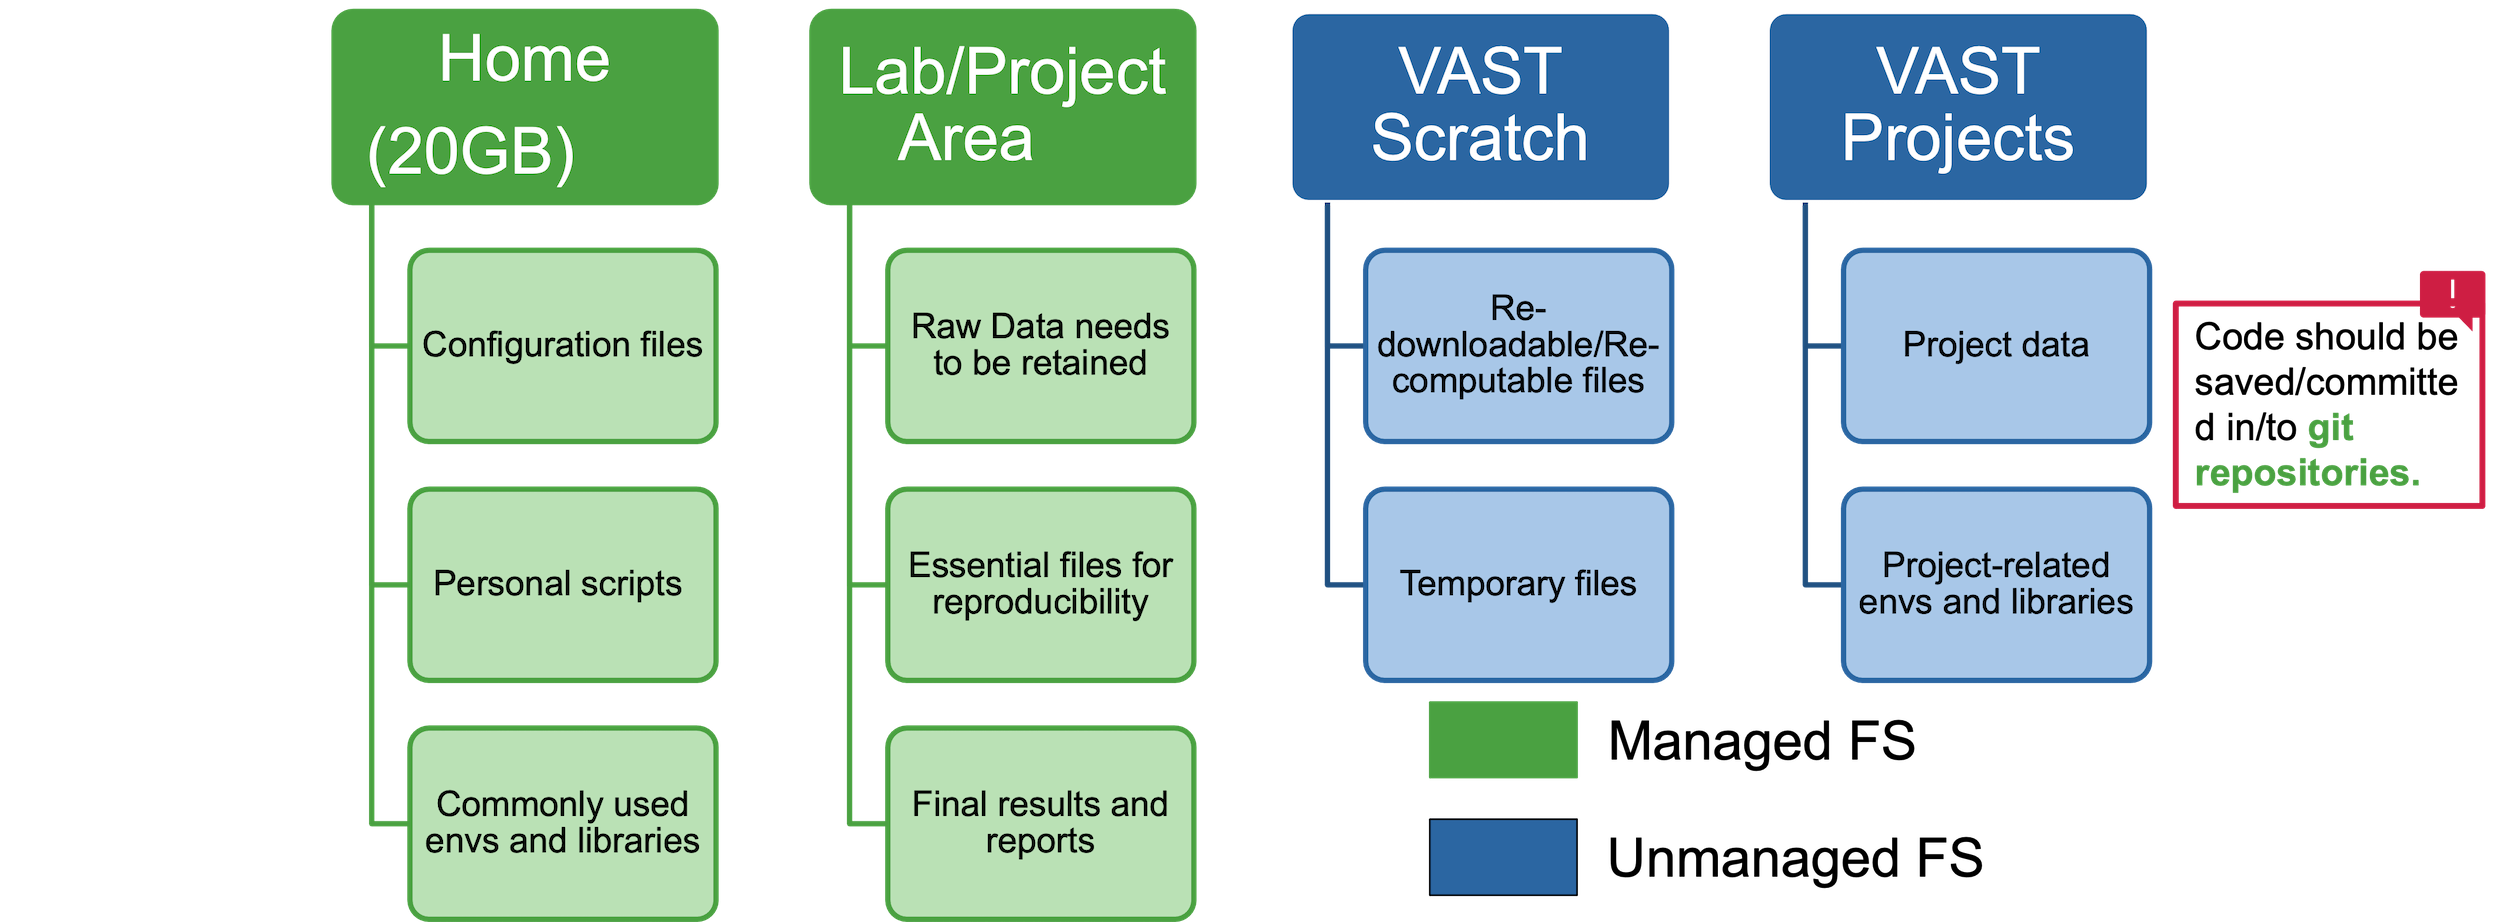
Milton File Systems

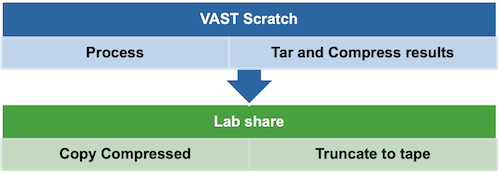
Looking Around Your Home
We will now revise some linux commands to look around the login node.
For more on Linux commands, visit our guide or watch the recording of the workshops here
Key Points
- HPC systems typically provide login nodes and a set of compute nodes.
- Files saved on one node are available on all nodes.
- Milton has multiple different file systems that have different policies and characteristics.
- Throughout a research project, research data may move between file systems according to backup and retention requirements, and to improve performance.
Content from Environment Modules
Last updated on 2023-05-16 | Edit this page
Overview
Questions
- How do we load and unload software packages?
Objectives
- Load and use a software package.
- Explain how the shell environment changes when the module mechanism loads or unloads packages.
On Milton, many softwares are installed but need to be loaded before you can run it.
Why do we need Environment Modules?
- software incompatibilities
- versioning
- dependencies
Software incompatibility is a major headache for programmers. Sometimes the presence (or absence) of a software package will break others that depend on it.
Two of the most famous examples are Python 2 and 3 and C compiler
versions. Python 3 famously provides a python command that
conflicts with that provided by Python 2. Software compiled against a
newer version of the C libraries and then used when they are not present
will result in errors.
Software versioning is another common issue. A team might depend on a certain package version for their research project - if the software version was to change (for instance, if a package was updated), it might affect their results. Having access to multiple software versions allow a set of researchers to prevent software versioning issues from affecting their results.
Dependencies are where a particular software package (or even a particular version) depends on having access to another software package (or even a particular version of another software package).
Environment modules are the solution to these problems. A module is a self-contained description of a software package – it contains the settings required to run a software package and, usually, encodes required dependencies on other software packages. HPC facilities will often have their own optimised versions of some software, so modules also make it easier to use these versions.
module command
The module command is used to interact with environment
modules. An additional subcommand is usually added to the command to
specify what you want to do. For a list of subcommands you can use
module -h or module help. As for all commands,
you can access the full help on the man pages with
man module.
Listing Available Modules
To see available software modules, use module avail:
OUTPUT
------------------------------------------ /stornext/System/data/modulefiles/tools -------------------------------------------
apptainer/1.0.0            go/1.19.4                    mpich-slurm/3.4.1                   openmpi/4.1.1-slurm
apptainer/1.1.0            go/1.20.2                    mpich-slurm/3.4.2                   openMPI/4.1.4
aspera/3.5.4               groovy/4.0.0                 mpich/3.3                           openSSL/1.0.2r
aspera/3.9.1               gzip/1.10                    mpich/3.3.2                         openSSL/1.1.1b
aspera/3.9.6               hdf5-mpich/1.10.5_3.3        ncftp/3.2.6                         openSSL/1.1.1g
awscli/1.16py2.7           hpl/2.3                      netcdf_c/4.9.2                      openSSL/1.1.1k
awscli/1.16py3.7           icewm/2.8.0                  nextflow-tw-agent/0.5.0             openSSL/1.1.1n
awscli/1.22.89             iftop/1.0                    nextflow/22.04.5                    owncloud-client/2.3.3
awscli/2.1.25              ImageMagick/6.9.11-22        nextflow/22.10.4                    pandoc/2.14.2
awscli/2.5.2               ImageMagick/7.0.9-5          nf-core/2.7.2                       pandoc/2.19.2
axel/2.17.10               intel-ipp/2019.5.281         ninja/1.10.0                        pgsql/15.1
bazel/0.26.1               intel-mkl/2019.3.199         nmap-ncat/7.91                      pigz/2.6
bazel/1.2.1                intel-mpi/2019.3.199         nodejs/10.24.1                      pmix/2.2.5
binutils/2.35.2-gcc-4.8.5  intel-tbb/2019.3.199         nodejs/16.19.0                      pmix/3.2.3
binutils/2.35.2-gcc-9.1.0  intel_mkl_2019/2019.5.075    nodejs/17.9.1                       pmix/4.2.3
cluster-utils/18.08.1      intel_mpi_2019/2019.5.075    ocl-icd/2.3.1                       poetry/latest
cmake/3.25.1               ior-slurm/3.2.1mpich3.3      octave/6.4.0-gcc11.1.0              proj/4.9.3
CUnit/2.1-3                ior-slurm/3.2.1openMPI4.0.2  oneMKL/2022.1.0.223                 proj/6.3.2
curl/7.65.0                ior/3.2.1mpio4.0.1           openBLAS/0.3.6-gcc-9.1.0            proj/9.1.0
depot_tools/6c7b829        iozone/3.491                 openBLAS/0.3.21-gcc-11.1.0          qpdf/10.0.1
dotnet/2.1.809             julia/0.6.4                  openBLAS/0.3.21-gcc-11.1.0-skylake  quarto/1.1.189
dotnet/3.1.412             julia/1.0.1                  openBLAS/0.3.23-gcc-11.3.0          rclone/1.55.0
dotnet/6.0.408             julia/1.5.3                  openCV/2.4.13.6                     rstudio_singularity/1.0.0
doublecmd/0.9.10.gtk2      julia/1.8.5                  openCV/4.2.0                        slurm-contribs/20.11.5
dua-cli/2.17.8             libaio/0.3.111               openjdk/1.8.0                       snakemake/7.12.0
dua-cli/2.19.0             libiconv/1.16                openjdk/13.0.2                      sqlite/3.38.5
duckdb/0.6.1               lz4/1.9.3                    openjdk/14.0.2                      sqlite/3.40.0
elbencho/1.7-1cu10.1       mariadb-client/10.11.2       openjdk/15.0.2                      sqlite/3.40.1
evince/3.28.2              mariadb-connector-c/3.1.11   openjdk/16.0.1                      stornext/1.1
feh/3.6.3                  mariadb-connector-c/3.3.4    openjdk/17.0.2                      stubl/0.0.10
fftw/3.3.9                 maven/3.3.9                  openjdk/18.0.2                      tar/1.34
fio/3.16                   maven/3.9.1                  openMPI-slurm/4.1.0                 tcpdump/4.9.2
Listing Currently Loaded Modules
You can use the module list command to see which modules
you currently have loaded in your environment. If you have no modules
loaded, you will see a message telling you so
OUTPUT
No Modulefiles Currently Loaded.Loading and Unloading Software
To load a software module, use module load. In this
example we will use Python 3.
Initially, Python 3 is not loaded. We can test this by using the
which command. which looks for programs the
same way that Bash does, so we can use it to tell us where a particular
piece of software is stored.
OUTPUT
/usr/bin/python3OUTPUT
Python 3.6.8We can look at the available python modules on
Milton
OUTPUT
---------------------------------------- /stornext/System/data/modulefiles/bioinf/its ----------------------------------------
python/2.7.18  python/3.5.3        python/3.7.0   python/3.8.3  python/3.9.5   python/3.11.2
python/3.5.1   python/3.6.5-intel  python/3.7.13  python/3.8.8  python/3.10.4
Now, we can load the python 3.11.2 command with
module load:
OUTPUT
Python 3.11.2Using module unload “un-loads” a module along with its
dependencies. If we wanted to unload everything at once, we could run
module purge (unloads everything).
Now, if you already have a Python module loaded, and you try to load a different version of Python 3, you will get an error.
OUTPUT
Loading python/3.8.8
  ERROR: Module cannot be loaded due to a conflict.
    HINT: Might try "module unload python" first.
You will need to module switch to Python 3.8.8 instead
of module load.
OUTPUT
Currently Loaded Modulefiles:
1) python/3.8.8Print information of modulefile(s)
Show the changes loading the module does to your environment
OUTPUT
-------------------------------------------------------------------
/stornext/System/data/modulefiles/bioinf/its/python/3.8.8:

module-whatis   {Python is a widely used high-level, general-purpose, interpreted, dynamic programming language. (v3.8.8)}
conflict        python
conflict        caffe2
conflict        anaconda2
conflict        anaconda3
conflict        CUDA8/caffe2
unsetenv        PYTHONHOME
setenv          PYTHON_INCLUDE_DIR /stornext/System/data/apps/python/python-3.8.8/include/python3.8
prepend-path    PATH /stornext/System/data/apps/python/python-3.8.8/bin
prepend-path    CPATH /stornext/System/data/apps/python/python-3.8.8/include/python3.8
prepend-path    MANPATH :/stornext/System/data/apps/python/python-3.8.8/share/man
prepend-path    LD_LIBRARY_PATH /stornext/System/data/apps/python/python-3.8.8/lib
What is $PATH?
$PATH is a special environment variable that controls
where a UNIX system looks for software. Specifically $PATH
is a list of directories (separated by :) that the OS
searches through for a command before giving up and telling us it can’t
find it. As with all environment variables we can print it out using
echo.
When we ran the module load command, it adds a directory
to the beginning of our $PATH. That is the way it “loads”
software and also loads required software dependencies. The module
loading process manipulates other special environment variables as well,
including variables that influence where the system looks for software
libraries, and sometimes variables which tell commercial software
packages where to find license servers.
The module command also restores these shell environment variables to their previous state when a module is unloaded.
Note
The login nodes are a shared resource. All users access a login node in order to check their files, submit jobs etc. If one or more users start to run computationally or I/O intensive tasks on the login node (such as forwarding of graphics, copying large files, running multicore jobs), then that will make operations difficult for everyone.
Content from Lunch Break
Last updated on 2023-05-15 | Edit this page
Take a 30-minutes lunch break.
Make sure you move around and look at something away from your screen to give your eyes a rest.
Content from Introducing Slurm
Last updated on 2023-05-16 | Edit this page
Overview
Questions
- What is a scheduler and why does a cluster need one?
- What is a partition?
Objectives
- Explain what is a scheduler
- Explain how Milton’s Slurm works
- Identify the essential options to set for a job
Job Scheduler
An HPC system might have thousands of nodes and thousands of users. A scheduler is a special piece of software that decides which jobs run where and when. It also ensures that a task is run with the resources it requested.
The following illustration compares these tasks of a job scheduler to a waiter in a restaurant. If you can relate to an instance where you had to wait for a while in a queue to get in to a popular restaurant, then you may now understand why sometimes your job do not start instantly as in your laptop.

Milton uses a scheduler (batch system) called Slurm. WEHI has 3500 physical cores, 44TB of memory, 58 GPUs and 90 nodes accessible by Slurm.
The user describes the work to be done and resources required in a script or at the command line, then submits the script to the batch system. The work is scheduled when resources are available and consistent with policy set by administrators.
Slurm
Simple Linux Utility for Resource Management
Slurm development has been a joint effort of many companies and organizations around the world. Over 200 individuals have contributed to Slurm. Its development is lead by SchedMD. Its staff of developers and support personnel maintain the canonical Slurm releases, and are responsible for the majority of the development work for each new Slurm release. Slurm’s design is very modular with about 100 optional plugins. It is used at Spartan, Massive, Pawsey, Peter Mac and Milton, as well as HPC facilities world-wide.

Fair Share
A cluster is a shared environment and when there is more work than resources available, there needs to be a mechanism to resolve contention. Policies ensure that everyone has a “fair share” of the resources.
Milton uses a multifactor job priority policy. It uses nine factors that influence job priority.
It is set such that:
- age: as the length of time a job has been waiting in the queue increases, the job priority increases.
- job size: the more resources (CPUs, GPUs, and/or memory), the higher priority.
- fair-share: the difference between the portion of the computing resource that has been requested and the amount of resources that has been consumed, i.e. the more resources your jobs have already used, the lower the priority of your next jobs.
In addition, no single user can have more than 8% of total CPUs or memory, which is 450 CPUs and 3TB memory.
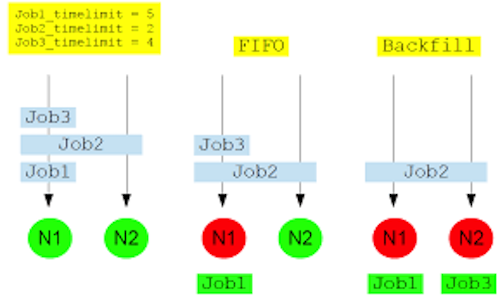
Backfilling
Milton uses a back-filling algorithm to improve system utilisation and maximise job throughput.
When more resource intensive jobs are running it is possible that gaps ends up in the resource allocation. To fill these gaps a best effort is made for low-resource jobs to slot into these spaces.
For example, on an 8-core node, an 8 core job is running, a 4 core job is launched, then an 8 core job, then another 4 core job. The two 4 core jobs will run before the second 8 core job.
if we have 2 8-core nodes, we receive:
- Job 1 request 4-cores and 5 hours limit
- Job 2 request 8-cores and 2 hours limit
- Job 3 request 4-cores and 4 hours limit
Without back filling, Job 2 will block the queue and Job 3 will have to wait until Job 2 is completed. With back filling, when Job 1 has been allocated and Job 2 pending for resources, Slurm will look through the queue, searching for jobs that are small enough to fill the idle node. In this example, this means that Job 3 will start before Job 2 to “back-fill” the 4 CPUs that will be available for 5 hours while Job 1 is running.
Slurm Partitions
Partitions in Slurm group nodes into logical (possibly overlapping) sets. A partition configuration defines job limits or access controls for a group of nodes. Slurm allocates resources to jobs within the selected partition by taking into consideration the resources you request for your job and the partition’s available resources and restrictions.
| Partition | Purpose | Max submitted jobs/user | Max CPUs/user | Max mem (GB)/user | Max wall time/job | Max GPUs/user |
|---|---|---|---|---|---|---|
| interactive | interactive jobs | 1 | 16 | 64 | 24 hours | 0 |
| regular | most of the batch work | 5000 | 454 | 3000 | 48 hours | 0 |
| long | long-running jobs | 96 | 500 | 14-days | 0 | |
| gpuq | jobs that require GPUs | 192 | 998 | 48 hours | 8 GPUs on 2 nodes | |
| gpuq_large | jobs that require A100 GPUs | 96 | 1000 | 48 hours | 1 A100 | |
| bigmem | jobs that require large amounts of memory | 500 | 128 | 1400 | 48 hours | 0 |
The main parameters to set for any job script
- time: the maximum time for the job execution.
- cpus: number of CPUs
- partition: the partition in which your job is placed
- memory: the amount of physical memory
- special resources such as GPUs.
We will discuss this more in the next episode.
Key Points
- The scheduler handles how compute resources are shared between users.
- A job is just a shell script.
- Request slightly more resources than you will need.
- Backfilling improves system utilisation and maximises job throughput. You can take advantage of backfilling by requesting only what you need.
- Milton Slurm has multiple partitions with different specification that fit the different types of jobs.
Content from Submitting a Job
Last updated on 2023-05-16 | Edit this page
Overview
Questions
- How do I launch a program to run on a compute node in the cluster?
- How do I capture the output of a program that is run on a node in the cluster?
- How do I change resource requested or time-limit
Objectives
- Submit a simple script to the cluster.
- Monitor the execution of jobs using command line tools.
- Inspect the output and error files of your jobs.
Running a Batch Job
The most basic use of the scheduler is to run a command non-interactively. Any command (or series of commands) that you want to run on the cluster is called a job, and the process of using a scheduler to run the job is called batch job submission.
Basic steps are:
- Develop a submission script, a text file of commands, to perform the work
- Submit the script to the batch system with enough resource specification
- Monitor your jobs
- Check script and command output
- Evaluate your job
In this episode, we will focus on the first 4 steps.
Preparing a job script
In this case, the job we want to run is a shell script – essentially a text file containing a list of Linux commands to be executed in a sequential manner.
Our first shell script will have three parts:
- On the very first line, add
#!/bin/bash. The#!(pronounced “hash-bang” or “shebang”) tells the computer what program is meant to process the contents of this file. In this case, we are telling it that the commands that follow are written for the command-line shell. - Anywhere below the first line, we’ll add an
echocommand with a friendly greeting. When run, the shell script will print whatever comes afterechoin the terminal.-
echo -nwill print everything that follows, without ending the line by printing the new-line character.
-
- On the last line, we’ll invoke the
hostnamecommand, which will print the name of the machine the script is run on.
This script ran on the login node, but we want to take advantage of
the compute nodes, we need the scheduler to queue up
example-job.sh to run on a compute node.
Submit a batch job
To submit this task to the scheduler, we use the sbatch
command. This creates a job which will run the script
when dispatched to a compute node. The queuing system
identified which compute nose is available to perform the work.
OUTPUT
Submitted batch job 11783863And that’s all we need to do to submit a job. Our work is done – now the scheduler takes over and tries to run the job for us.
Monitor your batch job
While the job is waiting to run, it goes into a list of jobs called
the queue. To check on our job’s status, we check the queue
using the command squeue -u $USER.
OUTPUT
     JOBID    PARTITION     NAME     USER ST       TIME  NODES NODELIST(REASON)
    11783909   regular example- iskander  R       0:06      1 sml-n02
ST is short for status and can be R (RUNNING), PD (PENDING), CA (CANCELLED), or CG (COMPLETING). If the job is stuck in pending, REASON column will reflect the reason, which can be one of the following:
- Priority: There are higher priority jobs than yours
- Resources: Job is waiting for resources
- Dependency: This job is dependent on another and it is waiting for that other job to complete
- QOSMaxCpuPerUserLimit: User has used CPUs limit of partition already
- QOSMaxMemPerUserLimit: User has used memory limit of partition already
Where’s the Output?
On the login node, this script printed output to the terminal – but
now, when the job has finished, nothing was printed to the terminal.
Cluster job output is typically redirected to a file in the directory
you launched it from. By default, the output file is called
slurm-<jobid>.out
Use ls to find and cat to read the
file.
Customising a Job
The job we just ran used all of the scheduler’s default options. In a real-world scenario, that’s probably not what we want. Chances are, we will need more cores, more memory, more/less time, among other special considerations. To get access to these resources we must customize our job script.
The default parameters on Milton is 2 CPU, 10MB Ram, 48-hours time-limit and runs on the regular partition
After your job has completed, you can get details of the job using
sacct command.
OUTPUT
JobID           JobName      NCPUS     ReqMem  Timelimit  Partition
------------ ---------- ---------- ---------- ---------- ----------
11783909     example-j+          2        10M 2-00:00:00    regular
We can change the resource specification of the job by two ways:
Adding extra options to the sbatch command
Modifying the submission script
BASH
#!/bin/bash
#SBATCH --job-name hello-world
#SBATCH --mem 1G
#SBATCH --cpus-per-task 1
#SBATCH  --time 1:00:00
echo -n "This script is running on "
hostname
Submit the job and monitor its status:
BASH
$ sbatch example-job.sh
Submitted batch job 11785584
$ squeue -u $USER
             JOBID PARTITION     NAME     USER ST       TIME  NODES NODELIST(REASON)
          11785584   regular hello-wo iskander  R       0:01      1 sml-n20
Comments in shell scripts (denoted by #) are typically
ignored, but there are exceptions. Schedulers like SLURM have a special
comment used to denote special scheduler-specific options. Though these
comments differ from scheduler to scheduler, SLURM’s special comment is
#SBATCH. Anything following the #SBATCH
comment is interpreted as an instruction to the scheduler. These SBATCH
commands are also know as SBATCH directives.
Remember Slurm directives must be at the top of the script, below the “hash bang”. No command can come before them, nor in between them.
Resource Requests
One thing that is absolutely critical when working on an HPC system is specifying the resources required to run a job. This allows the scheduler to find the right time and place to schedule our job. As we have seen before, if you do not specify requirements, you will be stuck with default resources, which is probably not what you want.
The following are several key resource requests:
-
--timeor-t: Time (wall-time) required for a job to run. Thepart can be omitted. default = 48 hours on the regular queue -
--mem: Memory requested per node in MiB. Add G to specify GiB (e.g. 10G). There is also--mem-per-cpu. default = 10M -
--nodesor-N: Number of nodes your job needs to run on. default = 1 -
--cpus-per-taskor-cNumber of CPUs for each task. Use this for threads/cores in single-node jobs. -
--partitionor-p: the partition in which your job is placed. default = regular -
--ntasksor-n: Number of tasks (used for distributed processing, e.g. MPI workers). There is also--ntasks-per-node. default = 1
-
--gres: special resources such as GPUs. To specify gpus, use gpu:: , for example, gres=gpu:P100:1, and you must specify the correct queue (gpuq or gpuq_large)
Note that just requesting these resources does not make your job run faster, nor does it necessarily mean that you will consume all of these resources. It only means that these are made available to you. Your job may end up using less memory, or less time, or fewer nodes than you have requested, and it will still run. It’s best if your requests accurately reflect your job’s requirements.
In summary, the main parts of a SLURM submission script
1. #! line:
This must be the first line of your SBATCH/Slurm script.
#!/bin/bash
2. Resource Request:
This is to set the amount of resources required for the job.
BASH
#SBATCH --job-name=TestJob
#SBATCH --time=00:10:00
#SBATCH --ntasks=1
#SBATCH --cpus-per-task=1
#SBATCH --mem=500M
3. Job Steps
Specify the list of tasks to be carried out. It may include an
initial load of all the modules that the project depends on to execute.
For example, if you are working on a python project, you’d definitely
require the python module to run your code.
bash module load python echo "Start process" hostname sleep 30 python myscript.py echo "End"
All the next exercises will use scripts saved in the exercise folder
which you should have moved to your current directory.
After 1 minute the job ends and the output is similar to this
OUTPUT
This script is running on Slurmstepd: error: *** JOB 11792811 ON sml-n24 CANCELLED AT 2023-05-13T20:41:10 DUE TO TIME LIMIT ***To fix it, change the script to
BASH
#!/bin/bash
#SBATCH -t 00:01:20 # timeout in HH:MM

echo -n "This script is running on "
sleep 70 # time in seconds
hostname
Try running again.
Resource requests are typically binding. If you exceed them, your job will be killed.
The job was killed for exceeding the amount of resources it requested. Although this appears harsh, this is actually a feature. Strict adherence to resource requests allows the scheduler to find the best possible place for your jobs. Even more importantly, it ensures that another user cannot use more resources than they’ve been given. If another user messes up and accidentally attempts to use all of the cores or memory on a node, Slurm will either restrain their job to the requested resources or kill the job outright. Other jobs on the node will be unaffected. This means that one user cannot mess up the experience of others, the only jobs affected by a mistake in scheduling will be their own.
When submitting to Slurm, you get an error
OUTPUT
sbatch: error: Batch job submission failed: Requested node configuration is not availableThis is because a GPU was requested without specifying the correct GPU partition, so the regular partition was used which has no GPUs. To fix it, change the script to
BASH
#!/bin/bash
#SBATCH -t 00:01:00
#SBATCH -p gpuq
#SBATCH --gres gpu:P100:1
#SBATCH  --mem 1G
#SBATCH --cpus-per-task 1

#This is  a job that needs GPUs
echo -n "This script is running on "
hostname
Try running again.
- Run the job
- Get which node it is running on from
squeue -u $USER - ssh into the node
- use
top -u $USER
We can have a live-demo on how to monitor a running job on the
compute node, using top, iotop and
nvtop for GPU nodes
Cancelling a Job
Sometimes we’ll make a mistake and need to cancel a job. This can be
done with the scancel command. Let’s submit a job and then
cancel it using its job number.
BASH
sbatch example-jobwithsleep.sh
Submitted batch job 11785772
$ squeue -u $USER
             JOBID PARTITION     NAME     USER ST       TIME  NODES NODELIST(REASON)
          11785772   regular example- iskander  R       0:10      1 sml-n20
$ scancel 11785772
$ squeue -u $USER
             JOBID PARTITION     NAME     USER ST       TIME  NODES NODELIST(REASON)
$
We can also cancel all of our jobs at once using the -u option. This will delete all jobs for a specific user (in this case, yourself). Note that you can only delete your own jobs.
Try submitting multiple jobs and then cancelling them all.
Check what you have in the queue
OUTPUT
             JOBID PARTITION     NAME     USER ST       TIME  NODES NODELIST(REASON)
          11792908   regular  job1.sh iskander  R       0:13      1 sml-n23
          11792909   regular  job1.sh iskander  R       0:13      1 sml-n23
          11792906   regular  job1.sh iskander  R       0:16      1 sml-n23
          11792907   regular  job1.sh iskander  R       0:16      1 sml-n23
Cancel the jobs
Recheck the queue
And the queue is empty.
You can check how busy the queue is through the Milton dashboards
Slurm Event notification
You can use --mail-type and --mail-user to
set SLURM to send you emails when certain events occurs, e.g. BEGIN,
END, FAIL, REQUEUE, ALL
Adding the above two lines to a submission script will make Slurm send me an email when my job starts running.
Slurm Output files
By default both standard output and standard error are directed to a
file of the name “slurm-%j.out”, where the “%j” is replaced with the job
id. The file will be saved in the submission directory as we saw before.
You can choose where the output files is saved and also separate
standard output from standard error using --output and
--error
-
--outputcan be used to change the standard output filename and location. -
--errorcan be used to specify where the standard output file shall be saved. If not specified, it will be directed to the standard output file.
In the file names you can use:
- %j for job id
- %N for host name
- %u for user name
- %x for job name
For example, running the following
sbatch --error=/vast/scratch/users/%u/slurm%j_%N_%x.err --output=/vast/scratch/users/%u/slurm%j_%N_%x.out job1.sh
will write error to slurm12345678_sml-n01_job1.sh.err and
output to slurm12345678_sml-n01_job1.sh.out in the
directory /vast/scratch/users/<username>, i.e. the
following will be created:
- a standard output file
/vast/scratch/users/iskander.j/slurm11795785_sml-n21_job1.sh.outand - an error files
/vast/scratch/users/iskander.j/slurm11795785_sml-n21_job1.sh.err.
Bonus QoS and preemption
Before we move to our next lesson, let’s breiflt talk about the bonus QoS. We have discussed before the limits of each partition. So what if you have run many jobs and hit the limit on the regular partition but when you look at the dashboards you observe that there are still free resources that can be used?
Can you make use of them as long as no one else needs them? Yes you can!
You can use --qos=bonus.
This will run your job in a preemptive mode, which means other users can terminate your job, if Slurm couldn’t find other resources for their jobs and they are using the normal QoS.
This is useful for jobs that can be resumed or restart is not an issue.
Key Points
-
sbatchis used to submit the job -
squeueis used to list jobs in the Slurm queue- passing the
-u <username>option will show jobs for just that user.
- passing the
-
sacctis used to show job details -
#SBATCHdirectives are used in submission scripts to set Slurm directives - Setting up job resources is a challenge and you might not get the first time
Content from Evaluating Jobs
Last updated on 2023-05-16 | Edit this page
Overview
Questions
- How to evaluate a completed job?
- How to set event notification for your jobs?
Objectives
- Explain Slurm environment variables.
- Demonstrate how to evaluate jobs and make use of multiple threads options.
Evaluating your Job
After a job has completed, you will need to evaluate how efficient it was, if it ran successfully, or investigate why it failed.
The seff command provides a summary of any job.
The jobs completes fast but not successfully
OUTPUT
Job ID: 11793501
Cluster: milton
User/Group: iskander.j/allstaff
State: OUT_OF_MEMORY (exit code 0)
Nodes: 1
Cores per node: 2
CPU Utilized: 00:00:01
CPU Efficiency: 50.00% of 00:00:02 core-walltime
Job Wall-clock time: 00:00:01
Memory Utilized: 0.00 MB (estimated maximum)
Memory Efficiency: 0.00% of 20.00 MB (10.00 MB/core)
Also, checking output
OUTPUT
.........................<other output>
slurmstepd: error: Detected 1 oom_kill event in StepId=11793501.batch. Some of the step tasks have been OOM Killed.
This shows that the job was “OOM Killed”. OOM is an abbreviation of Out Of Memory, meaning the memory requested was not enough, increase memory and try again until job finishes successfully.
Slurm Environment Variables
Slurm passes information about the running job e.g what its working directory, or what nodes were allocated for it, to the job via environmental variables. In addition to being available to your job, these are also used by programs to set options like number of threads to run based on the cpus available.
The following is a list of commonly used variables that are set by Slurm for each job
-
$SLURM_JOBID: Job id -
$SLURM_SUBMIT_DIR: Submission directory -
$SLURM_SUBMIT_HOST: Host submitted from -
$SLURM_JOB_NODELIST: list of nodes where cores are allocated -
$SLURM_CPUS_PER_TASK: number of cores per task allocated -
$SLURM_NTASKS: number of tasks assigned to job
use $SLURM_CPUS_PER_TASK with -p option
instead of setting a number.
Content from Break
Last updated on 2023-05-15 | Edit this page
Take a 30-minutes break. If you can, move around and look at something away from your screen to give your eyes a rest.
Content from Slurm Commands
Last updated on 2023-05-15 | Edit this page
Overview
Questions
- How to use Slurm commands?
Objectives
- Explain how to use the other Slurm commands?
- Demonstrate different options for Slurm commands like
squeueandsinfo.
Slurm Commands Summary
| Command | Action |
|---|---|
sbatch <script> |
Submit a batch script |
sacct |
Display job details (accounting data) |
sacctmgr |
View account information |
squeue |
View information of jobs currently in queue |
squeue -j <jobid> |
Get specific job details, job should be in the queue |
squeue -u <userid> |
Get all queued job details for specified user |
scancel <jobid> |
Cancel job |
sinfo |
View information about nodes and partitions |
sinfo -N |
View list of nodes |
sinfo -s |
Provides nodes’ state information in each partitions |
sinfo -p <partition> |
Provides nodes’ state information in the specified partition |
scontrol show job <jobid> |
View detailed job information |
scontrol show partition <partition> |
View detailed partition information |
Provides summary information of only the specified partition
OUTPUT
PARTITION AVAIL  TIMELIMIT   NODES(A/I/O/T) NODELIST
gpuq up 2-00:00:00 2/10/0/12 gpu-a30-n[01-07],gpu-p100-n[01-05]Provides information of the specified node in the specified partition
OUTPUT
PARTITION AVAIL  TIMELIMIT  NODES  STATE NODELIST
gpuq         up 2-00:00:00      0    n/a
The results says that node is not available, this is because there is
no node called sml-n02 in the regular partition. To fix it,
we can either change the partition to regular or the node
to something like gpu-a30-n01
OUTPUT
PARTITION AVAIL  TIMELIMIT  NODES  STATE NODELIST
regular* up 2-00:00:00 1 mix sml-n02OUTPUT
JOBID      PARTITION   NAME    USER    STATE       TIME    CPUS    TIME_LIMIT    NODES      REASON        MIN_MEMORY        NODELIST      PRIORITY
11774748      gpuq    guppy    luo.q  PENDING       0:00     20    2-00:00:00       1 QOSMaxNodePerU         400G                        2060
11774747      gpuq    guppy    luo.q  PENDING       0:00     20    2-00:00:00       1 QOSMaxNodePerU         400G                        2060
11774746      gpuq    guppy    luo.q  PENDING       0:00     20    2-00:00:00       1 QOSMaxNodePerU         400G                        2060
11774744      gpuq    guppy    luo.q  RUNNING 1-05:28:48     20    2-00:00:00       1           None         400G        gpu-a30-n01     1366
11774745      gpuq    guppy    luo.q  RUNNING 1-05:41:49     20    2-00:00:00       1           None         400G        gpu-a30-n03     1360
OUTPUT
NODELIST             PARTITION        STATE CPUS   MEMORY ALLOCMEM      AVAIL_FEATURES CPUS(A/I/O/T)      GRES_USED
cl-n01               bigmem            idle  192  3093716        0   Cooperlake,AVX512   0/192/0/192          gpu:0
gpu-a10-n01          gpuq_intera       idle   48   256215        0GPU,Icelake,A10,AVX5     0/48/0/48.     gpu:A10:0
gpu-a30-n01          gpuq             mixed   96   511362   409600GPU,Icelake,A30,AVX5    20/76/0/96.     gpu:A30:1
gpu-a30-n02          gpuq              idle   96   511362        0GPU,Icelake,A30,AVX5     0/96/0/96.     gpu:A30:0
gpu-a30-n03          gpuq             mixed   96   511362   409600GPU,Icelake,A30,AVX5    20/76/0/96.     gpu:A30:0
gpu-a30-n05          gpuq              idle   96   511362        0GPU,Icelake,A30,AVX5     0/96/0/96      gpu:A30:0
gpu-a30-n06          gpuq              idle   96   511362        0GPU,Icelake,A30,AVX5     0/96/0/96.     gpu:A30:0
gpu-a30-n07          gpuq              idle   96   511362        0GPU,Icelake,A30,AVX5     0/96/0/96.     gpu:A30:0
gpu-a100-n01         gpuq_large       mixed   96  1027457   819200GPU,Icelake,A100,AVX     2/94/0/96.     gpu:A100:1
gpu-a100-n02         gpuq_large       mixed   96  1027457   819200GPU,Icelake,A100,AVX     2/94/0/96.     gpu:A100:1
gpu-a100-n03 gpuq_large mixed 96 1027457 819200GPU,Icelake,A100,AVX 2/94/0/96. gpu:A100:1Content from Interactive Slurm Jobs
Last updated on 2023-05-15 | Edit this page
Overview
Questions
- How to start and exit an interactive Slurm job?
Objectives
- Explain how to use
sallocto run interactive jobs
Interactive jobs
Up to this point, we’ve focused on running jobs in batch mode. There are frequently tasks that need to be done interactively. Creating an entire job script might be overkill, but the amount of resources required is too much for a login node to handle. To solve this, Slurm provides the ability to start an interactive session.
Interactive sessions are commonly used for:
- Data management, eg. organising files, truncation and recall of files, downloading datasets.
- Software/workflow preparation/testing, eg. developing/debugging scripts, downloading/building software.
- Interactive data analysis.
- Rapid analysis cycles.
- Running n application with a GUI.
On Milton, you can easily start an interactive job with
salloc.

You will be presented with a bash prompt. Note that the prompt will
change to reflect your new location (sml-n02 in the
example), which is the compute node we are logged onto. You can also
verify this with hostname.
Remember that, you may have to wait for resources, depending on the status of the queue you are requesting. We have designed the interactive partition to provide high availability, but only one job per user.
The interactive job will be cancelled and removed from the queue, if
your terminal session is terminated or closed, and/or internet
connection is lost (connection with the slurm node lost). It is
recommended to use screen or tmux
When you have finished your task, please remember to close the
session using exit or Ctrl-D.
You can also cancel the session using scancel.
If you need more resources you can run interactive sessions in the other partitions.
Creating remote graphics
To see graphical output inside your jobs, you need to use X11
forwarding. To connect with this feature enabled, use the
-Y option when you login to the login nodes or
vc7-shared.
ssh -Y vc7-sharedTo use it in an interactive session add it to --x11 to
your salloc command
OUTPUT
salloc: Pending job allocation 11803274
salloc: job 11803274 queued and waiting for resources
salloc: job 11803274 has been allocated resources
salloc: Granted job allocation 11803274
salloc: Nodes sml-n03 are ready for jobOUTPUT
Loading Relion 3.1.3 using CUDA 11.2
Using MotionCor2 1.5.0 at /stornext/System/data/nvidia/motioncor2/motioncor2-1.5.0cu11.2/bin/motioncor2
No matching version of Gctf exists for CUDA 11.2
Using CTFFIND 4.1.14 at /stornext/System/data/nvidia/ctffind/ctffind-4.1.14/bin/ctffind

        WARNING: verify that the area where Relion will be used
        is not over its storage quota. If Relion is unable to write
        files this might cause severe corruption in the Relion
        pipeline star files.


Loading relion/3.1.3-cu11.2
  Loading requirement: cuda/11.2 mpich-slurm/3.4.2
We will now have a live demo for more interactive options on Milton.