GUI
PartiNet includes a browser-based graphical interface built with Gradio. It covers all three pipeline stages — Denoise, Detect, and Star File — and is designed as a beginner-friendly alternative to the CLI.

Run the GUI from a local Python installation (Installation — pip, conda, or a virtualenv on your workstation or cluster login node). Apptainer/Singularity and Docker images are intended for the CLI pipeline on HPC; running partinet gui inside a container is possible but not recommended.
For large-scale or automated processing, the CLI remains the recommended approach.
A local install avoids extra bind-mount and cache setup (--no-home, Hugging Face theme cache), keeps Slurm tools (sbatch, scancel) on the host PATH, and makes SSH port forwarding straightforward. On HPC, use the GUI locally on the login node and submit compute-heavy work via Slurm
Launching the GUI
partinet gui
Gradio will print the URL to the terminal. On a login node, use 127.0.0.1 or localhost — not 0.0.0.0, which is only a bind address.
Running on local URL: http://127.0.0.1:7860
Open that URL in your browser on the login node, or set up SSH port forwarding from your laptop:
ssh -L 7860:127.0.0.1:7860 user@login-node
Then open http://localhost:7860 in your local browser.
Options
| Option | Default | Description |
|---|---|---|
--host | 127.0.0.1 | Host address to bind the server to |
--port | auto | Port to run the GUI on; auto-selects a free port if omitted |
--share | off | Create a temporary public Gradio link (useful for remote sharing) |
# Pin a specific port
partinet gui --port 7860

# Generate a public share link
partinet gui --share
Project Directory
The Project directory field at the top of the GUI is set once and auto-fills all stage-specific paths:
| Field | Auto-filled value |
|---|---|
| Denoise → Project directory | <project> |
| Detect → Denoised images directory | <project>/denoised |
| Detect → Project directory | <project> |
| Star File → Labels directory | <project>/exp*/labels (latest detect run) |
| Star File → Denoised images directory | <project>/denoised |
| Star File → Output STAR file | <project>/particles.star |
Individual fields remain editable if you need to override a path for a specific stage.
Running jobs
Open the Running jobs accordion (below the project directory) to see active jobs submitted from the GUI for the current project. The table refreshes automatically every five seconds, or click Refresh.
| Column | Description |
|---|---|
| Stage | denoise, detect, or star |
| Mode | local or slurm |
| ID | Slurm job ID or local process ID |
| Status | running, pending, etc. |
| Started | UTC timestamp when the job was submitted |
To cancel a job, select it from Select job and click Cancel selected. Local jobs are terminated; Slurm jobs receive scancel. Job metadata is stored in <project>/.partinet_jobs/manifest.json so Slurm jobs remain visible (and cancellable) after a browser refresh.
Selecting a job in the dropdown shows its live log in Job log (refreshed every five seconds while selected). Logs are read from the stage log file (partinet_denoise.log, etc.) and, for Slurm jobs, the batch script output under .partinet_jobs/.
Only jobs submitted from this GUI session for the current project directory are listed.
Appearance
The GUI uses the lone17/kotaemon Gradio theme and opens in dark mode by default (via ?__theme=dark on first load). You can switch to light or system mode using Gradio’s theme toggle in the footer.
The theme is downloaded from the Hugging Face Hub on first launch (requires network once; cached afterward). Star File statistics plots use a dark matplotlib style to match the UI.
Optional environment variables at launch:
PARTINET_PROJECT— pre-fill the project directoryPARTINET_WEIGHTS— pre-fill the Detect weights pathPARTINET_SLURM_CONFIG— path to a user-owned YAML file with default Slurm settings
Execution modes (Local / Slurm)
Open Execution settings to choose how each stage runs:
| Mode | Description |
|---|---|
| Local | Run partinet as a subprocess on the machine hosting the GUI |
| Slurm | Write a batch script under <project>/.partinet_jobs/ and submit with sbatch |
All Slurm fields (partition, account, time, CPUs, GPUs, memory) are optional — leave them blank to use your cluster defaults. Use Job setup script for site-specific setup (module load, conda activate, container apptainer exec, etc.) without hardcoding paths in the PartiNet source.
Logs stream in the browser from {project}/partinet_denoise.log, partinet_detect.log, or partinet_star.log. Slurm job IDs are shown when a batch job is submitted.
On HPC, run the GUI on a login or visualization node (with SSH port forwarding) and submit Denoise, Detect, and Star File jobs to compute nodes via Slurm.
Stage 1 · Denoise
Applies the PartiNet Wiener filter denoiser to raw micrographs and saves cleaned images to project/denoised/.
Key inputs:
| Field | Description |
|---|---|
| Raw micrographs directory | Folder of .mrc files from motion correction |
| Project directory | All PartiNet outputs are written here |
| Output image format | png (recommended), jpg, or mrc |
| CPU workers | Number of parallel workers; leave blank to auto-detect |
Progress is streamed live into the log window during processing.
Stage 2 · Detect
Runs the DynamicDet particle detector on denoised micrographs. Results are saved to project/exp/.
Key inputs:
| Field | Description |
|---|---|
| Model weights (.pt) | Pre-trained weights file — download from HuggingFace |
| Denoised images directory | Output of the Denoise stage (project/denoised/) |
| Project directory | Detection outputs saved here |
| GPU device(s) | Leave blank to auto-detect; use cpu if no GPU is available |
| Confidence threshold | Lower = more picks. Recommended: 0.0–0.3 |
| IOU threshold | Controls removal of overlapping boxes. Default 0.2 |
Advanced options (image size, dynamic threshold) are available under the collapsible Advanced options panel.
Stage 3 · Star File
Loads detections from a Detect run, provides interactive statistics and a micrograph preview, then generates a STAR file for CryoSPARC or RELION.
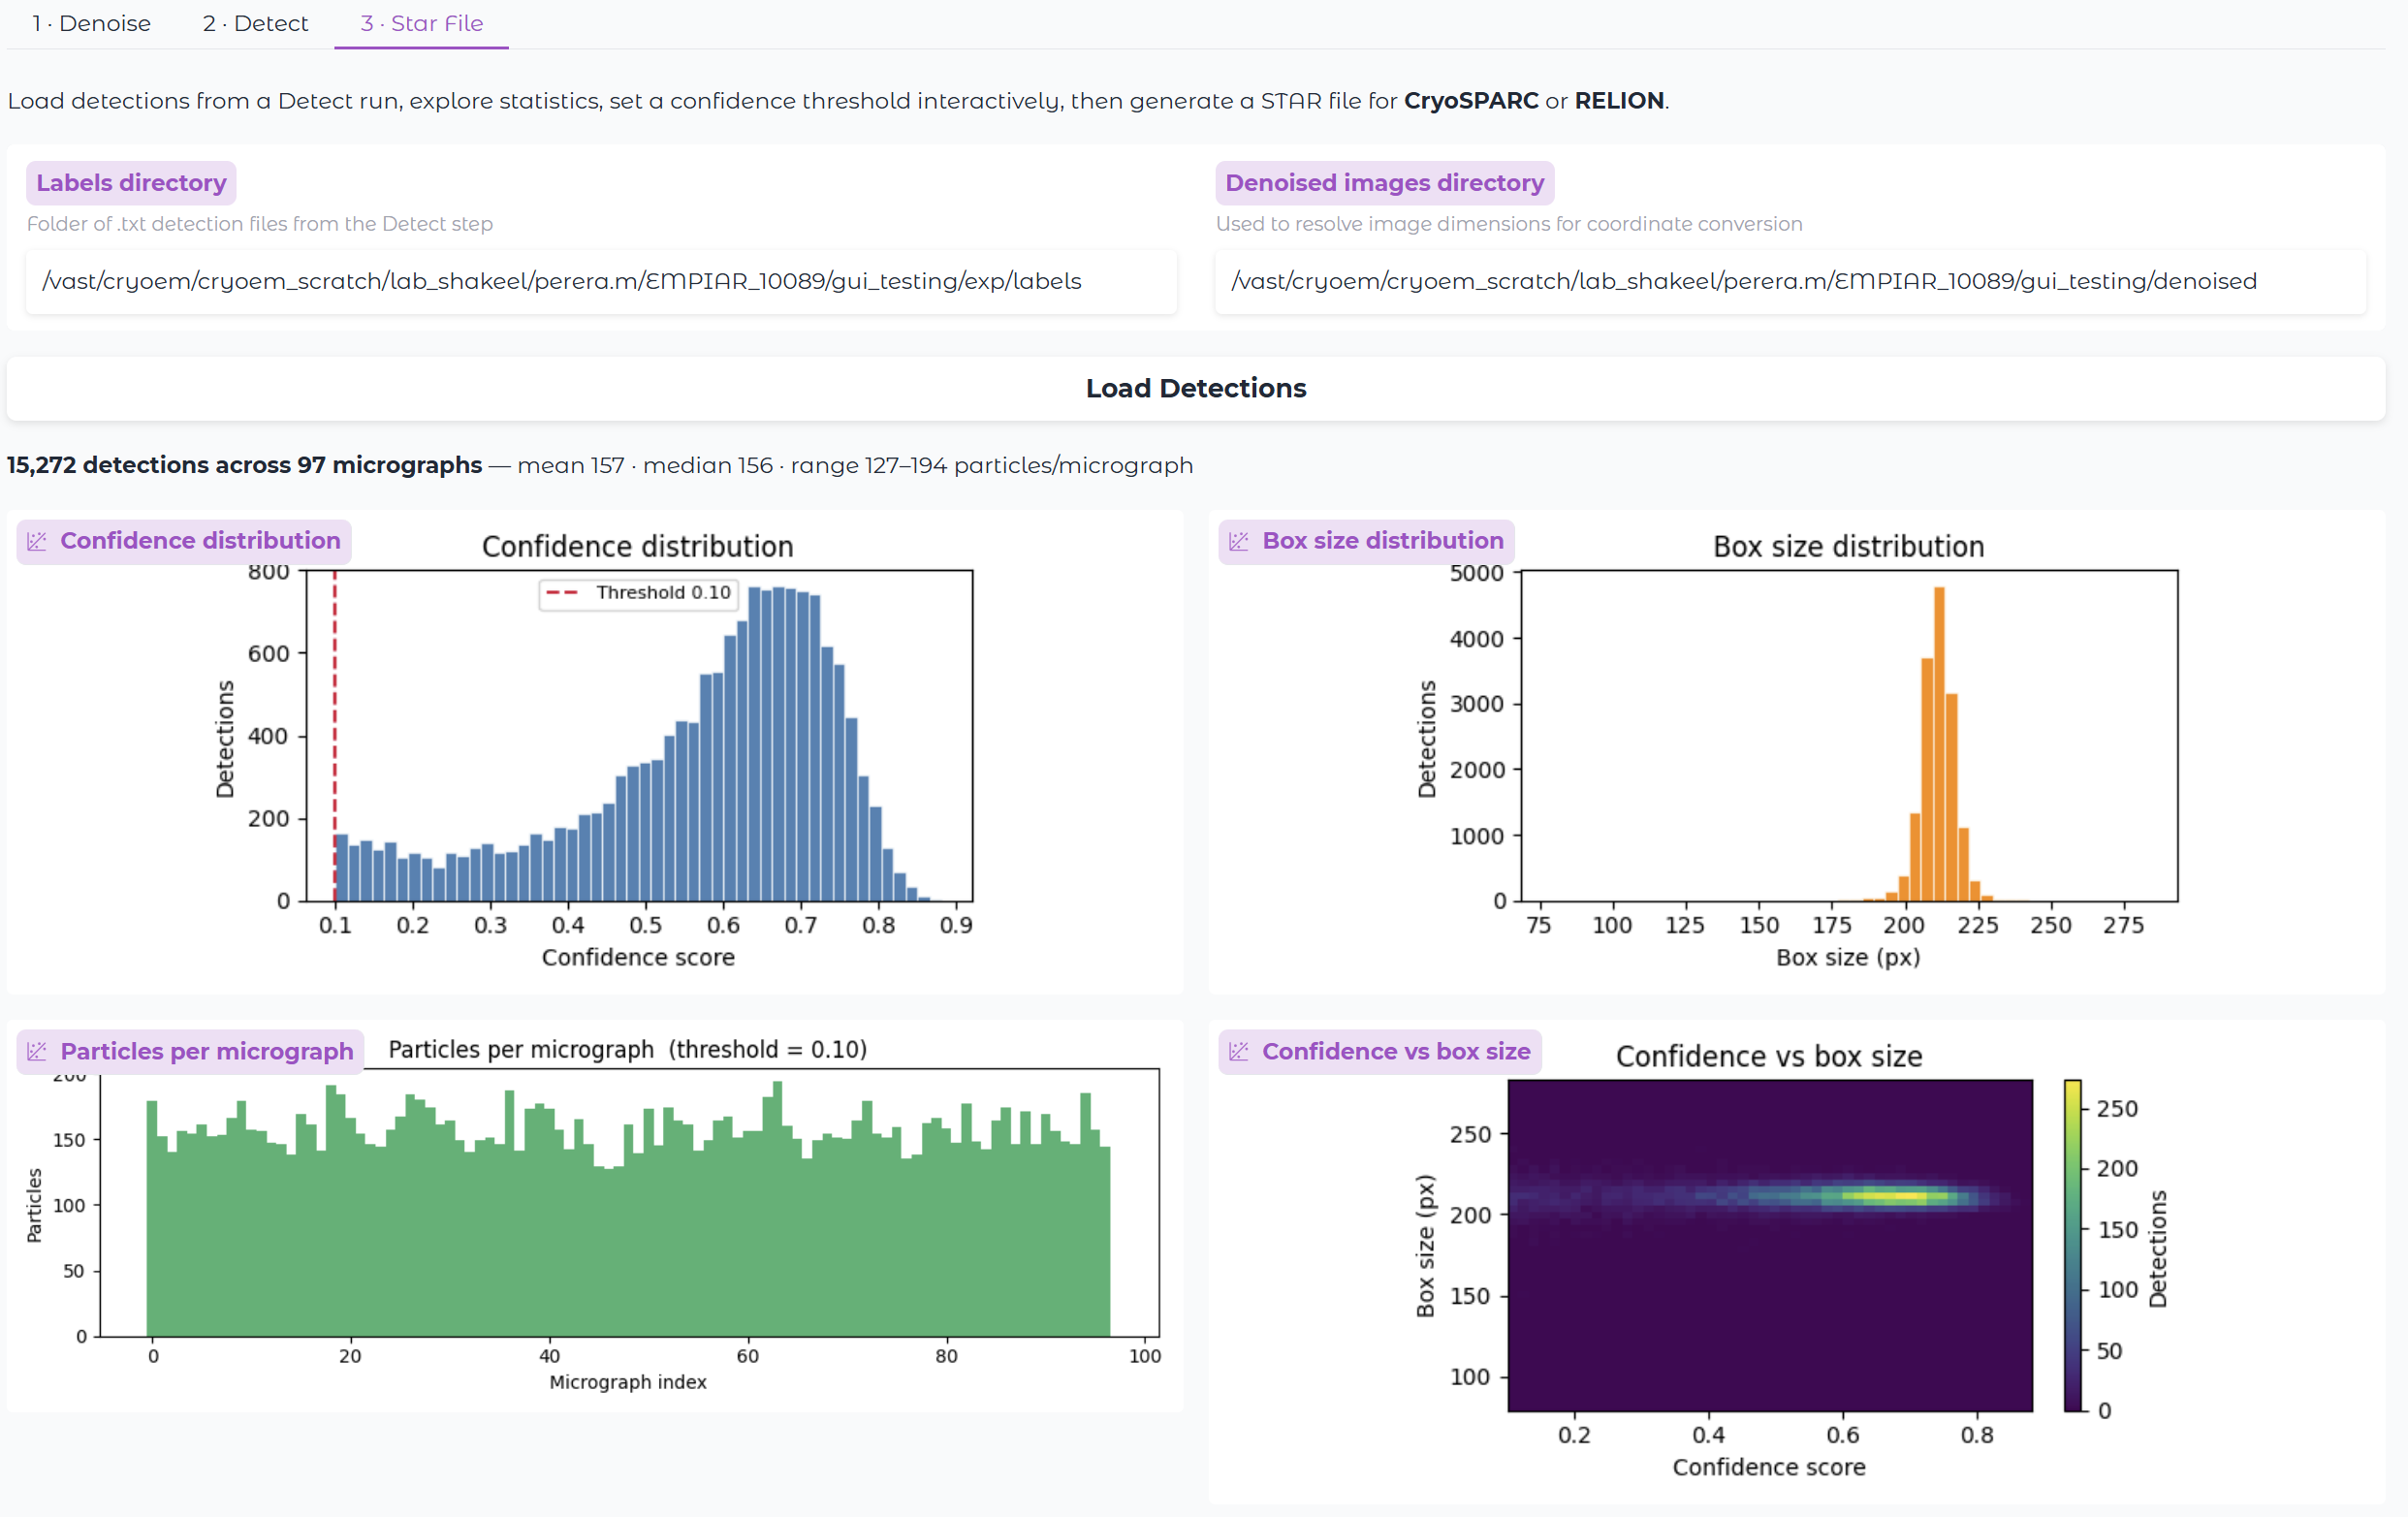
Load Detections
Enter the labels directory and denoised images directory, then click Load Detections. The GUI displays:
- Total detection count and particles-per-micrograph summary
- Confidence score distribution histogram
- Box size distribution histogram
- Particles per micrograph bar chart (updates with threshold)
- Confidence vs box size bivariate histogram
Threshold and Preview
Use the Confidence threshold slider to filter detections interactively. The plots and retained-particle count update in real time.
Select a micrograph from the Preview micrograph dropdown to see detection boxes drawn on the image. Box colour indicates confidence: green = high, red = low.
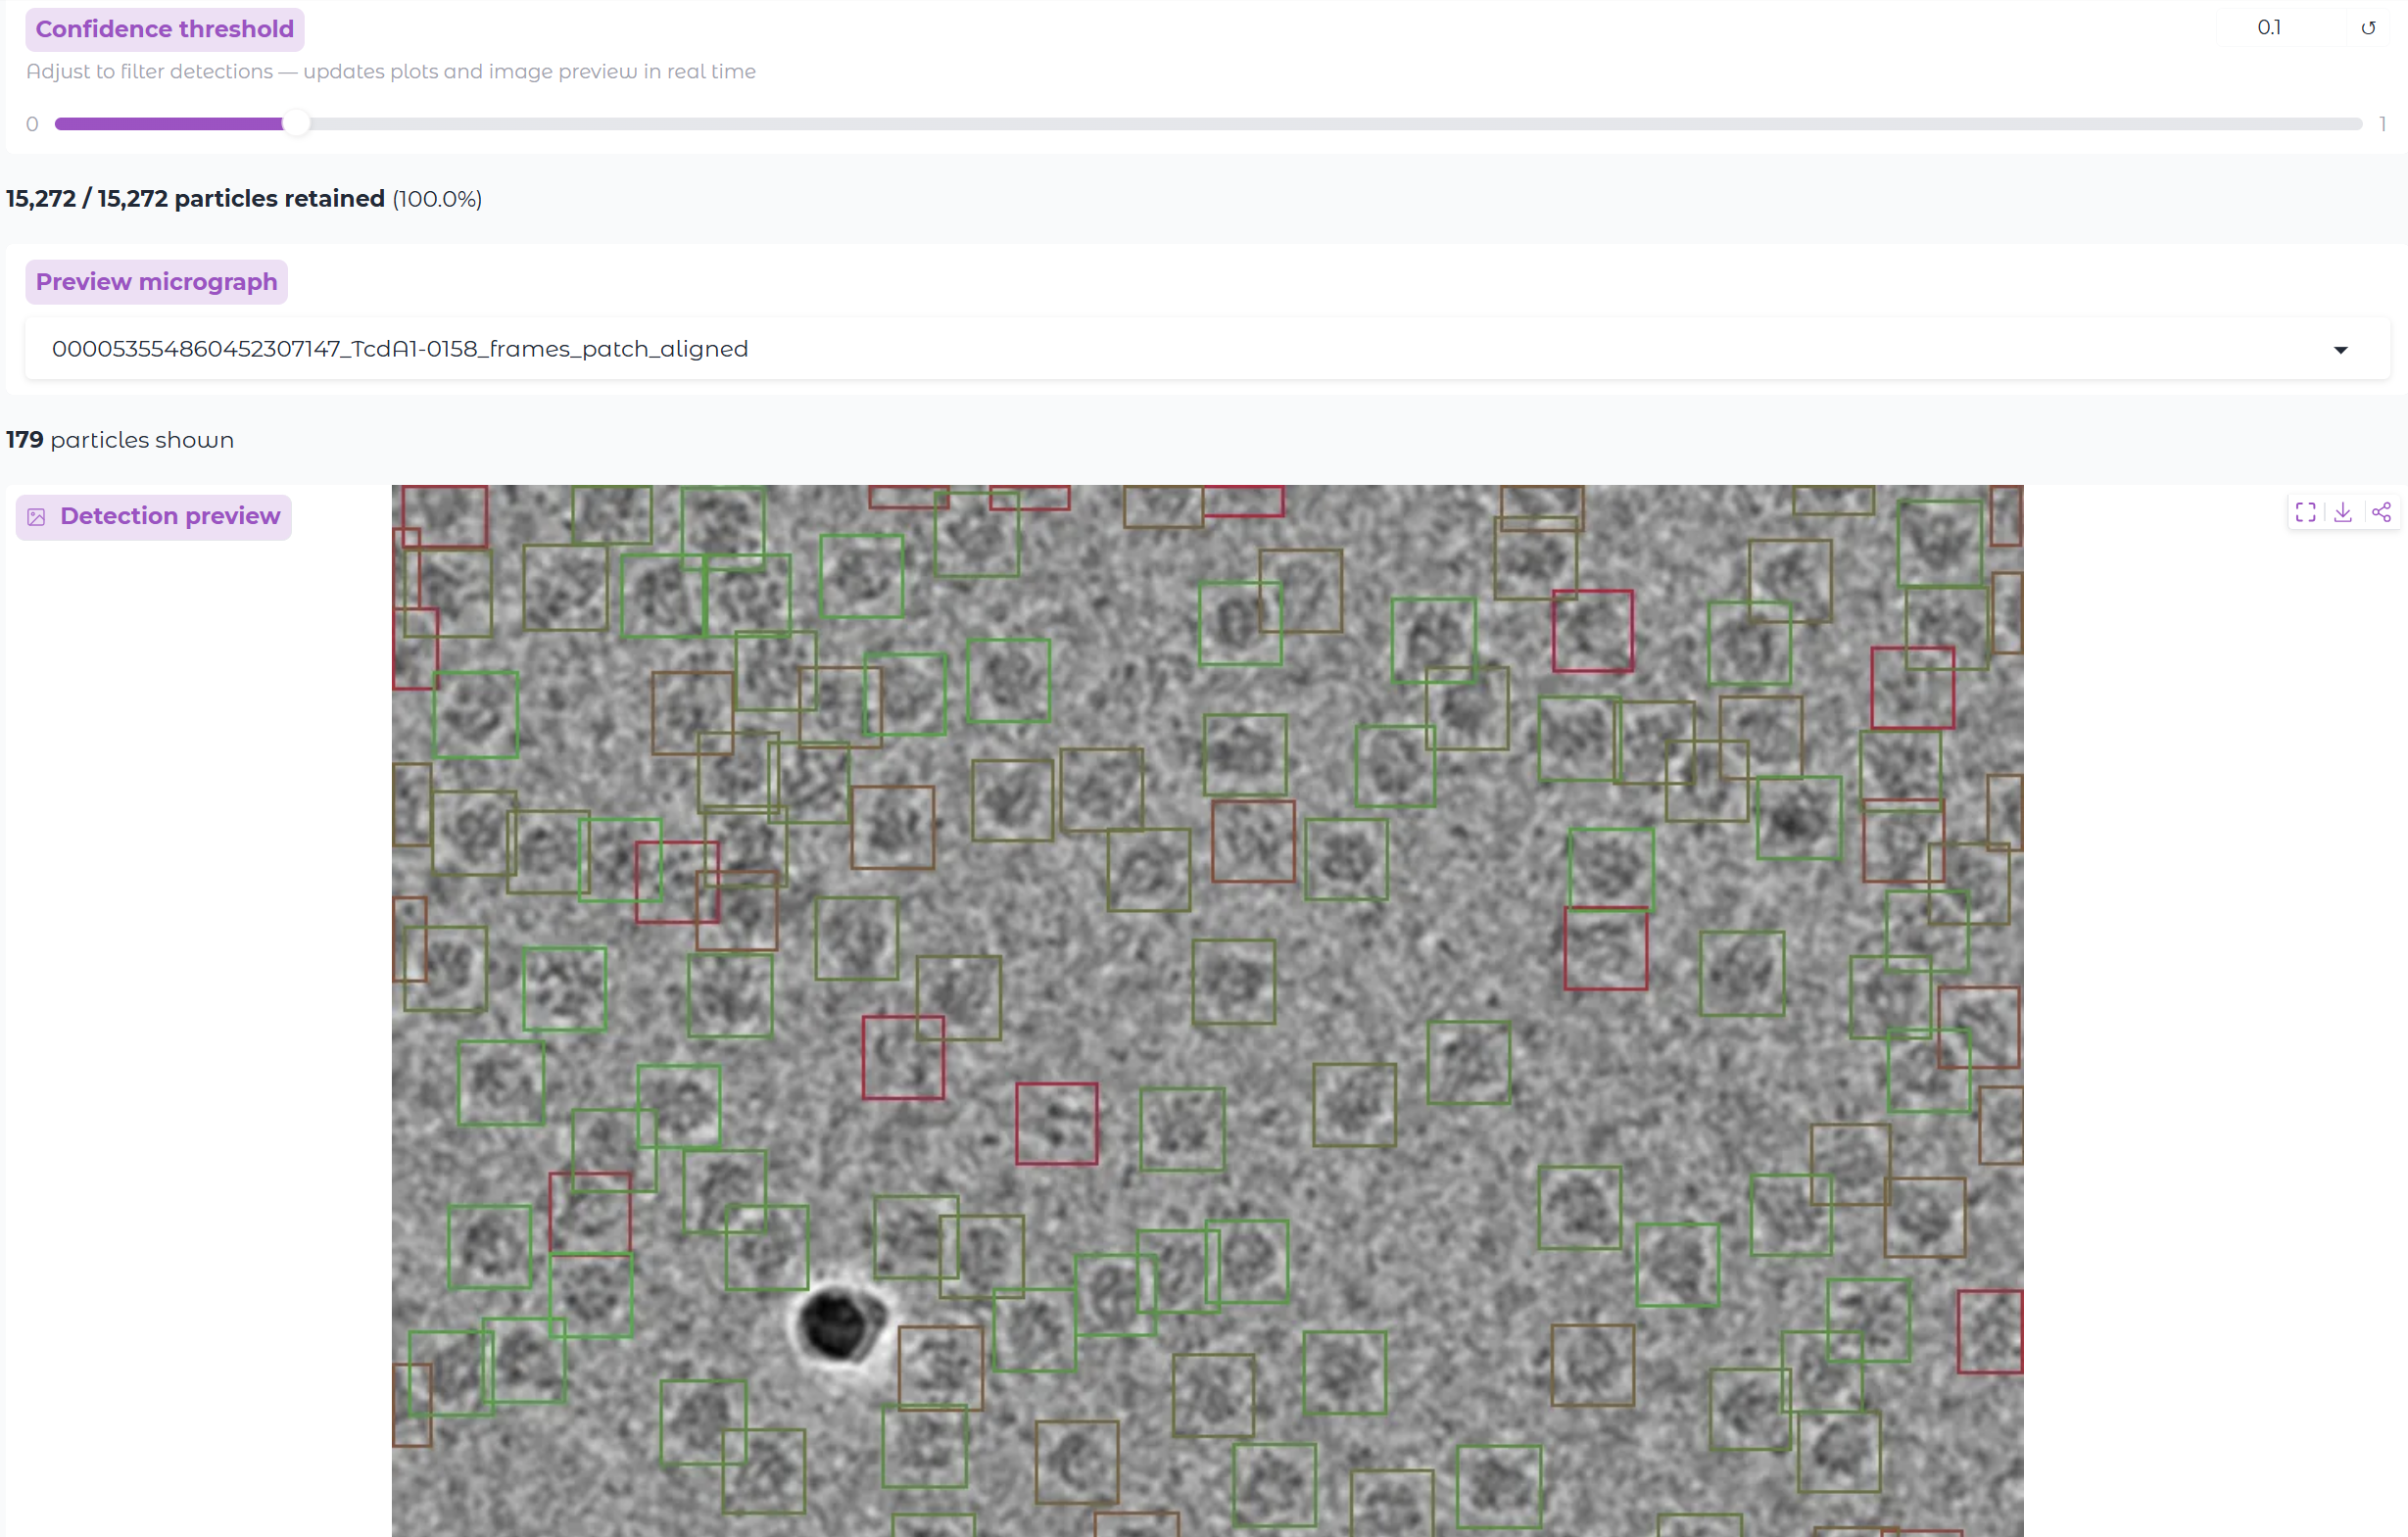
Generate STAR File
Click Generate STAR File to write a CryoSPARC-compatible .star file. The confidence threshold set above is applied at export time.
RELION output is available under the optional accordion — enable it to also produce a pick.star and per-micrograph coordinate files in the RELION project directory format.